Seeing as how we didn't get any Christmas cards mailed out again this year, I figured I could at least post a few pictures of us from earlier this year.


 Merry Christmas everyone!
 Merry Christmas everyone!
Pagosa Peak, coming from a Native American name meaning “healing waters” that the nearby town of Pagosa Springs is famous for, was the first real peak that I ever climbed, close to sixteen years ago. While I have climbed many other peaks in the area since, I still try to get up there once a year if possible.
Now the years have been good to me in way other than giving me a love for mountains. My wife, Dawn, and I were married just a few weeks before that first climb and we have four beautiful children, Thalia age 8, Thaddeus age 6, Gwendolyn age 4,and Cianen age 2. We all get out in the mountains almost daily during the summer and fall to do a lot of wildcrafting, although most of the hiking and mountain climbing is left to me and my friends. So a couple of years ago we decided to try taking them up Pagosa Peak and see how they would do. They were very excited to be climbing a mountain so there was very little whining. But they were going a lot slower than I had expected and the clouds were beginning to build up. By the time we had reached the summit it had taken us about four hours to do three miles (albeit, almost every single step is uphill) and the last twenty minutes were through a misty kind of rain, with distant thunder that threatened more, and being above timberline we were totally exposed.
After a few minutes and a late, brief lunch we turned back and then the weather turned bad. Lightening began punching near us, deafening us with its thunder and sending Thalia into a panic. Then the downpour began. I have been through many mountain storms before, I even enjoy them for the most part, but this was almost too much for my little family. The trail had turned into a creek so my wife, with baby Cianen on her back, grabbed Thaddeus’s hand, while I grabbed Thalia’s and picked up Gwen while we slipped and slid our way down. More than once I had the two oldest just sit down and slide to a lower part of the trail. The rain stopped not to long after we were back in the trees but the path continued to be slick and treacherous, and with everyone wet and chilled I pushed them hard to keep moving fast until we reached our Jeep. The sun was shining when we got there and we all lay down to bask in its warming rays.
After that day Thalia was paranoid to go anywhere in the high country if we strayed more than a few hundred feet from the vehicle, frustrating us to no end. Finally, a little more than a year later, I convinced her to climb Pagosa Peak again, just the two of us, so we would be able to deal with her fear.
I chose a day that was forecast to be clear and we left very early, watching the almost full moon set while we drove. There was just enough light to see easily by when we reached the trailhead and it was cold, maybe around twenty degrees or so, being deep into autumn. We were no more than fifty steps down the trail when her fear kicked in and I eventually I was forcing myself not to get frustrated explaining and refuting all the wild things her fertile imagination thought could go wrong. At one point she was almost in hysterics, but she eventually calmed down when I just kept pushing her, not allowing any breaks or stops, and making her lead the way. From then on we just kept on the pace, she can be a steady hiker when she lets herself, and soon her confidence rose, and together we were able to rout her anxiety every time it arose.
By the time we reached the saddle, about two miles in, the sun was just emerging over it, greatly warming our spirits and not much further arrived at timberline. This is where the storm hit us last time, on an exposed ridge with very steep and rocky terrain on one side, and a sharp drop on the other. I could see the hysteria creeping up on Thalia again as we followed the steep ridge up, but I was able to talk it down and I tried to keep her occupied by constantly pointing out things we could see from here.
Before she even knew what was happening we were within a few minutes of the summit and she became very excited, telling me how glad she was we were doing this together. Pagosa Peak has a double peak actually, after you reach what you think is the top, you see another peak, slightly higher, just a couple hundred yards away, but with a deep dip in between the two. On Thalia’s first climb last year, it looked despairing to her seeing that there was still more to go. But this time she attacked it with relish, crossing it quicker than I thought she could.
Once there we removed our packs the conversation turned to her achievement, how happy and thankful she was that I had kept pushing her so we could experience this. A depth of fatherly pride welled up in me, and mingling with the sense of exhilaration that I always feel upon summiting a mountain, there was a profound and intense emotion that I had never experienced in the outdoors before.
This place that had once held a personal sacredness for me, being my first summit, had just changed, and I knew that I would no longer associate this mountain with just my own accomplishment anymore, but with my precious little girl overcoming her fears.


All right, just thought I would give an update as to how things went in Sandpoint this week. But I suppose first I should explain a bit more of why I was going there in the first place. I said before that I was going to try out for a chef position. Well I feel more freedom to write about this now that it is over. I had driven up to Sandpoint a couple months ago to look at some property and pass out my resume to various restaurants. Not much later I was contacted by the Executive Chef/Owner of a nice steakhouse called The Hydra. After a little correspondence I found out that he was looking for a sous chef and was willing to fly me there to try it out. Well, this has always been one of my ambitions, but not having any formal training in that way (i.e. culinary school or apprenticeship), so this opportunity seemed to come out of nowhere, I was only expecting employment as a regular cook.
So everything went well, it seems like nice atmosphere to work in and the menu is great. I spent some time trying to find a rental for us, something for just a month or two, as I cannot get financing to buy in the area until I have worked for thirty days.
The job should be a good fit for me and the owner thinks so as well, so now I only have to talk this over with the family and we should be moving very soon. My only hope is that something will turn up in the housing department before we arrive as it seems to cool for long-term camping.
And for anyone interested in looking at the menu that I will be working with soon, I have a link here. Let me know what you think.
As I sit here the majestic Rockies pop into view. I am on an airplane flying from Albuquerque to Denver and from there to Spokane. It is a bit new to me. The last time I was on a plane was about fifteen years ago and now I am here in the air again, only this time I have a laptop that I am typing this out on, and I will be able to upload it while at the airport. At the same time I am listening to my friend Ian’s mix Synthetic Opera Vol I. It is very inspiring to see the mountains out there, wondering exactly where that little area of the San Juans I know so well is. I have forgotten how things look from upon high and it is inspiring, it even makes New Mexico look nice.
Anyhow, my reason for this flight is that I am going to try out for a new job up in Sandpoint Idaho. I do not really want to write about the specifics of it yet, but I will say that it consists of real chef-type duties again. It is something that I love to do and while it has been a few years since I have used these abilities, I find that I am pretty confident of them returning easily. Besides at home, my only real kitchen work these last couple years has been making tacos and their ilk. (NO, not taco bell. Real made to order tacos with fresh ingredients!) If it all works out and they like me, then, we should be moving soon. If it doesn’t, well, we will cross that bridge if we come to it.
As I am looking out at the Front Range I am also reminded of how many mountains I have not and never will climb. Well we are approaching now and I must end this little blog. More to come later.
Today we are going to talk about yogurt, what it is, a little bit about its history, and finishing with how to make it in your home.
Basically yogurt is milk that has been cultured with one or more strains of bacteria. While this thickens the milk it also changes it into an even more healthful food, even when using milk that has been pasteurized and homogenized. While I don’t condone them, even the big corporate owned, name brand yogurts are relatively good for you. For while they are using inferior based products (i.e. non-organic or natural) these bacteria still do their job and make something beneficial for you. Of course, since a quick perusal of the ingredient list shows that most of them contain nuero-toxins and/or other chemicals, I would still advise avoidance.
The word yogurt is Turkish in origin, yoğurt, coming from their word yoğun, meaning thick or dense. There are also several variations of the word in the English speaking world. Yogurt, yoghurt, and yogourt, with yoghourt being a little used alternative, are all accepted forms. (Although my WORD program disagrees).
Cultured milk products have been in use for at least 4,500 years. The first yogurts would have been fermented with wild bacteria, with the oldest mention being attributed to that rascally first-century writer, Pliny the Elder, who wrote that certain nomadic tribes knew how “to thicken milk into a substance with an agreeable acidity”. Throughout the next nineteen centuries there are numerous writings describing yogurt and its “miraculous” abilities. It wasn’t until the early 1900’s that it became less and less of a cultural heritage and more of a corporate possession.
Now making yogurt is pretty easy after figuring things out with a little trial and error. First you need a recipe or method. I will explain how we do it here in the Coatney household, but first we will discuss other methods. I have recently done a google search and all the sites that came up seemed to be quite difficult ways of doing it, some using quite a bit of equipment in rooms that looked like they had a very large research grant. Others used yogurt makers, machines that took care of the incubation stage, but why use electricity when it is the same principle and just as easy without it? And sure, you make it at home, but I think it adds a barrier between you and your product while losing a bit of the “homemade” satisfaction.
My first real inklings of making yogurt at home was years ago when my wife mentioned it while reading the book Nourishing Traditions by Sally Fallon, which will one day be a blog on here. Suffice it to say, it is a book about going back to heirloom-type recipes and methods along with the research to support the benefits. We soon picked up a book called Wild Fermentation by Sandor Katz —which could almost be called a follow up to the previous, as the author used many of the recipes and ideas as his starting point. Taking Sandor’s yogurt recipe we slowly evolved our own style which will be described below.
The first thing needed to do is talk about what equipment is needed. Most households will have these as they are very basic and if yours doesn’t then investing in them would be worthwhile for more than making yogurt. I use two wide mouth quart jars per batch, but you will want more than this as you will be making a new batch before the last is gone. Sometimes you can find these at thrift stores but the best bet is to buy a case of twelve at your local supermarket, hardware store, or if you must, Wal-Mart. These usually go for eight to twelve dollars a case. Also make sure they have the seal tops and rings, if not they should sell them there separately. Next you need a good two to four quart pot with a lid. We use a Pyrex two quart. The advantage of this is two-fold. It is heavy bottomed so it does not scorch easily, and it is glass, meaning it is see through, giving you a visual element. I can tell when it is ready just by how it looks, without even taking the lid off. You will also want a good ladle with a pour spout. Trust me, the pour spout makes a huge difference, all the milk goes into the jar as opposed to all over the workspace. And remember, a larger ladle means fewer dips, although too large and you will be making more mess. A 4oz would be ideal. Now, no good kitchen should be without a probe, or candy thermometer. This will be used to tell all the various stages of heat until you are able to tell yourself by sight and touch. Last of all is needed a small cooler. Just make sure it will easily hold your two jars without a lot of extra room. (More on why later).
The ingredients are fairly commonplace and should be easy to get. And if you want superior yogurt you must start with superior products. First, whole milk, of the organic variety. If you can get raw then so much the better, but I have yet to try it for yogurt, and the process is slightly different, so I would suggest more research before using it with this recipe. Next is your starter yogurt. Again buy organic. You want plain and one that says “cream on top” or “whole milk”, and also make sure it says “live and active cultures”. This last is very important for without it you would have nothing to work with. A good brand to use that can be found nationally is Brown Cow. Any other ingredients are optional to mix in after the yogurt is finished making such as maple syrup, fruits, or jellies.
The process begins by measuring your milk. I like to do this by filling your quart jar up twice, keeping it about a half inch from the top, and after each pouring in into the pot. Next the milk must be heated. I do mine on a warm spot on the wood stove, but a gas or electric range will work as long as it is on low heat. The milk needs to be brought up to 180˚F very slowly. A good idea is to put a lid on it as the surface will heat quicker and gently stir every so often. Doing this on my woodstove the heat is so even that I don’t need to stir. Another way to tell when it reaches temp is when it just begins to form bubbles, although this is harder to tell if you are stirring. Now it is time to cool the milk. Remove from the heat, setting it in a cool part of your kitchen. Leave the lid on or else a skin will form. I usually check it after an hour and then fifteen minute intervals until it drops to 110˚F. Some recipes call for setting it in an ice bath or cool water, but for me this involves more babysitting as the temp changes quickly. I recommend using the thermometer the first few times and getting a feel for what it feels like by placing your (clean) finger in the milk. It should feel just slightly warmer than water that is being used with yeast for bread making.
When it is getting close you should get everything else together. Bring some water to boil and use it to sterilize the jars, lids, and ladle. Put about a tablespoon of your starter yogurt into each jar. When the milk is at temp ladle it into the jars. Once they are full, put on the lids and rings tightly and shake enough to mix the yogurt in well. Put the jars in the cooler and fill the cooler with very hot water from the tap to just below the rings on the jars. Shut the cooler up and put it somewhere it will not be disturbed for at least twelve hours. I go about twenty-four myself. The bacteria don’t like being moved about during the incubation stage so be careful. Now when the time is up check them and see if they set up. It might not be as thick as you are expecting, but it should be much thicker than milk. All that is left is to enjoy it. And also remember to never use up all you have, save enough for a starter on your next batch and if made often enough so that it doesn’t go bad, then you should be able to keep this strain going indefinitely.

We have had our wood cook stove for a little over a year now and I thought that it would be a great subject for an in-depth blog. We spent most of the summer of 2008 looking around online for a stove that would be just right for us. We eventually settled on the Pioneer Maid, a large efficient stove made from welded steel covered with a porcelain finish.
Once it was ordered we had only to wait for the delivery and collect enough firewood. Oh, and build a new room to house the wood stove. A very good thing it was going to be six to eight weeks till it was delivered! We had a decent sized covered porch (about 7’x16’), that we decided to enclose, taking the front door, adjacent widow , and the wall between them out ,making a large entryway from our new room into the house. After the framing and setting of windows and the door, we did the sheetrock, getting it textured and painted. Next we built a rock hearth that was three and a half inches off the sub-floor, using the large, flat, lichen-covered rocks so prevalent in our area. We then had to build a large tile wall to go behind the stove an inch or so away from the framed wall as fire prevention. All in all it was a vast improvement to our living situation, giving us a space for our washer and new chest freezer as well as twice the amount of natural light we had before. The work was finished (well not quite, I still have yet to trim it all out), just days before the wood stove arrived.
We had a date and time scheduled for the delivery, but the truck it was on broke down, leaving our stove in the truck to be towed away. The shipping company called and they said they would let me know the day before they would try to deliver it again. A couple of days later I am at work when Dawn calls to tell me she received a call from the driver saying that he is about to drop the stove off at the bottom of the county road we live on, whether anyone is there to pick it up or not. I quickly get someone to cover the rest of my shift and I rush home hoping someone is there to help me move this thing. There is no one. My father-in-law, Dave, is gone and my brother-in-law, Duane, is asleep still and is almost impossible to wake up. I take Duane’s truck as I have no other way of getting the wood stove home and I arrive at the bottom of the road just as the driver is pulling off the highway. After about ten minutes the two of us manage to load it into the truck. The entire time he is cursing and grumbling and I have to refrain from telling him we paid to have it delivered to the door.
That evening Dave, Duane, and I try to move it into the house. Even after removing all the weight we can from it, it is still extremely heavy. It takes us more than an hour to get it in place. A few days later we have it all put together and the stovepipe installed. Then all that was left was lighting our first fire and as we did so we all gathered round to see and feel the effects. It was our first night in quite a while that was warm as we were determined not to light our gas heater since turning the pilot off the spring before.
Before I go on I would like to give a description of the cook stove. To start it has a large firebox. For most wood cook stoves the firebox is rather small, not able to fit very large pieces of wood which means it burns quicker so you have to watch it and add wood more often. But this one will take a log up to 21 inches long and 9 inches around. There are a lot of BTU’s in a piece of wood that size and it will burn a long time, especially if it is dense like oak. The walls and floor of this firebox are lined with insulated firebrick about an inch and a half thick with the exception of a 2 inch hole in the floor for ash removal, with a very large ash pan beneath it. Directly to the right of the firebox is the oven which is 22 inches deep, 19 inches wide, and 13 inches high with a thermometer on the door that measures upwards of 500˚F. Past this is the water reservoir, a large box that can hold eleven gallons of water which helps immensely with keeping our house humid. I recently installed an outdoor water valve on the bottom of this, letting us use the hot water for reheating bath water.
The stove top itself is where most of the weight is, being a large single piece of thick steel. There are three holes with lids on this top, the first for loading the firebox, the second for cleaning above the oven, and the third is for filling the reservoir. Two foot above the flat top is the warming box which gets around 100˚ more or less inside.
Now on to the things we do with it. It can be used for cooking in much the same manner as a gas or electric range, only you move things around to where it is hotter or cooler to adjust your temp rather than turning a knob. It does take more time to get things hot unless you have a raging fire below, so it takes a bit more planning for a meal. One of my favorite things is to make stocks on here. I get it boiling while the fire is hot and then move it over where it is less than a simmer. When I shut the stove down for the night so it radiates a lesser heat for the whole night, I just move it back over to the hot spot and let it go slow all night and sometimes the next day. This makes a much richer and deeper flavored stock that almost cannot be compared. Something that we started doing a little more recently is using the flattop for cooking flour tortillas on. We simply put them directly on the stove when it is really hot, getting maybe sixteen or so on at a time. Three minutes and one flip later and they are finished, greatly reducing the time spent making them. Pancakes are done in much the same way, just needing some butter or oil down first.
The oven does its job quite well, as long as the temperature can be kept where you want it. Basically this means checking it often, giving the fire more air or less as needed and opening the damper to release or store heat. It also works well for drying things such as sprouted grains by leaving the oven door cracked. Doing this will keep it around 150˚ to 200˚F with a warm fire going. For heating the house we just leave the oven door opened all the way, making it nice and warm inside. The manufacturer states that doing this will heat a 2000 square foot house, and with our house being much less we have never once needed to turn on a heater.
Now to the warming oven. Besides being useful for drying foods, reheating meals, or just keeping foods warm, it is a great place for wet mittens and hats. But even better it doubles as our clothes dryer. As we cannot hang clothes outside in the winter we drape it all over the warmer. We also have a clothes line that we string across the room in front of the stove. With a warm fire these will dry overnight.
After all this time we are finally learning the maintenance of the stove. Not only must the ashes be dumped periodically, say once a week or so, but there is also cleaning inside the woodstove around the oven. There is a 2 or 3 inch space around most of the oven that can quickly build up with creosote, keeping the heat from circulating around the oven, which in turn will not heat up properly. There is also the need to clean the chimney a few times a year, which is actually easier to do than it sounds. All I do is take the top off the stovepipe, scraping away any buildup of creosote that is on it. I then proceed to shove the chimney sweep down the pipe, pulling it in and out a few times. Next I remove the two pieces of stovepipe sticking above the roof which allows me to sweep all the way down to the woodstove. Then it is just a simple matter of putting it all back and cleaning the stove out from what all fell down into it.
In closing I would like to say that this has probably been one of the best purchases of our life. A wood cook stove is an almost must have for self-sufficiency and I cannot help but think we have one of the best stoves on the market.
I know that the majority of my posts lately have been on hiking, so this post will be more in line with this site’s original intention of self-sufficiency. What I would like to do is review things that we have learned and improved upon in the last year. This will be broken up into subjects that hopefully I can expand upon later with individual postings.
Wood Cook Stove- We bought this new in the fall of 2008, so we spent most of last winter and spring just learning how to use it for heating the house and not as much for cooking or baking as we would have liked. This season we have been able to devote more time to that. We have the cook top nice and seasoned and now we can make tortillas, pancakes and things of that nature quickly and in quantity right on top. I think my next blog will probably be about this, talking about how we got it, features that it has and the many things we do with it.
Pet Food- in our household we have a great medium sized dog and three cats. Back in the spring after much research by Dawn we decided to start them on a raw diet, consisting of raw meat, (deer, elk beef and chicken,) mixed with pureed raw veggies. It has seemed to make a definite improvement in their energy and their coats are much healthier. Now easy it is not. There has been some backsliding but it is our preferred way of feeding them, and actually it is what they favor as well.
Yogurt- This is something we have been making off and on for a couple of years now, but the last few months we have got it to be a process with the right results every time, instead of hoping with each batch that it works. Using the wood cook stove to slowly heat the milk was a big improvement and we can now make it without the use of a thermometer. This is something that I hope to share soon, posting the whole process with pictures, with the desire for more people to try this.
Buttermilk-Making this is something that Dawn takes care of almost exclusively, but her process has also improved with time. This is something that I will collaborate on for posting in the future.
Wild Game- While we did not do any hunting or fishing this year, between others sharing parts of their animals and picking up road kills we were well blessed. My butchering skills improve each time, but we still desire to learn more about using the whole animal.
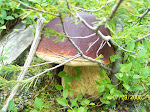
Mushrooms-Here in Pagosa Country it was a poor mushroom year. Early in the season we found a few inedibles (see previous posts). We had planned on going Morel hunting down in the lower country but that never happened. The rest of the season consisted of us going out a lot but not finding much of anything. Usually we come home with bagfuls, almost more than we can reasonably process, drying them so we can enjoy the bounty all year, so we are constantly missing them this winter.
Apples-If it was a poor mushroom year, for apples it was completely opposite. Our spring was unseasonably warm, letting all the apple blossoms set into fruit. Before last year we knew of a few trees we could pick from, mostly near the Chimney Rock area, but this year we saw apples everywhere we drove. We identified scores of new trees, all of which we had driven by for years without a single apple upon them, that were now covered with fruit. And not just apples. A wild peach tree we knew of was just loaded, although most of them were picked by someone else before they were ripe. We were given peaches and we even got a great deal on buying a couple bushels from Chimney Rock Farms. (And for those of you who know me I still don’t like the nasty fruit, but we can’t deprive the family, eh?) While picking apples one day I noticed some large berry looking things on some bushes nearby. A closer inspection revealed wild plums! We ended up with a lot of them, plus my in-laws plum tree was so heavily laden that we were invited to pick from it multiple times. All in all we process at least three quarters of our apples and we still have buckets of them under our house.
Berries- Strawberries and raspberries were found, although not in their usual profusion. Bilberries seemed to suffer the same fate as the mushrooms, in fact I only found a small handful s worth. But the hawthorns and chokecherries were everywhere. In our quest to pick less from roadsides we were in search of new areas to pick from, and I assure you, we found them. They were big and happy this year and our only problem was making sure to avoid encounters with bears. This was a fall where every bear surely was able to pack on the winter pounds.
Mead- We have been making mead for a number of years now but it always seems like we are learning something about it. I am planning a detailed series of posts soon on mead making from start to finish.
Beer- There has only been two times that we have ever tried making beer, and while they were not the best in the world it is a pretty neat experience and something that I am sure we can improve upon. Our first attempt was a ginger ale that we let go a little too long leaving it a bit flat but with a nice flavor. Our next try was from a malt that we made ourselves that was pretty tasty, but could be a lot better.
Hard Apple Cider- In previous years we have made one gallon batches, but with the apple harvest we had this year…, well lets just say that after seven gallons we got a bit burnt out on juicing. But there are still all those apples under the house. If we do start making more with these then I will get some photos of the process and do a post devoted to nothing but cider.
Books- There were quite a few books added to our collection this year that are directly related to self-sufficiency, learning how to do things in the home , or on identifying. This list does stretch back to Christmas of 2008. Mushrooms Demystified by David Arora. The bible of North American mushrooms, we had been drooling over this book a long time till I finally ordered a copy late last winter. All That the Rain Promises by the same David Arora. A gift, this is a collection of the best edibles and stories of people who love them. Mushrooms of Colorado by Vera Evanson. A gift, this contains the most common mushrooms found here along with some that are more area specific. Guide to Colorado WildfowersVolumes I&II by G.K. Guennel. These are books the kids got for Dawn’s birthday. While not containing anything about uses, these are some of the best books for identification in our area. The encyclopedia of Country Living by Carla Emery. A gift to Dawn, this is THE book on doing things yourself. The New Complete Book of Self-Sufficiency by John Seymor. A prolific writer on the subject with an English point of view, this book was a gift along with The New Self Sufficient Gardener and Forgotten Household Crafts, both by the same late John Seymor. A greener Life by Clarissa Dickson Wright. A gift to Dawn, this is another take on English do-it-yourself living, Clarissa is one half of the wonderful Two Fat Ladies cooking show from the nineties. The Rainbow beneath My Feet by Arleen Bessette. A guide for using mushrooms as dyes. A Natural Year by Grace Firth. A book on harvesting and preserving naturally. In Praise of Apples by Mark Rosenstein. Just as the name says, this is everything about apples. Sacred and Healing Herbal Beers by Stephen Buhner and The Complete Meadmaker by Ken Schramm. Two books on brewing, these were gifts to Dawn. Medicinal Mushrooms by Christopher Hobbs. As the name implies this is the medicinal uses of certain mushrooms and the research behind it.